
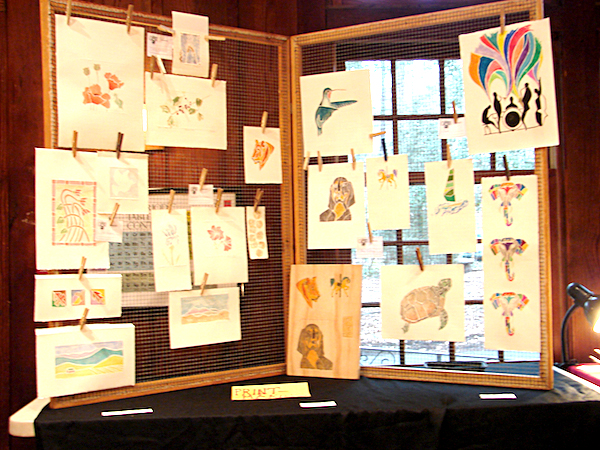
14 Jan White-Line Printing with Sandy Webster
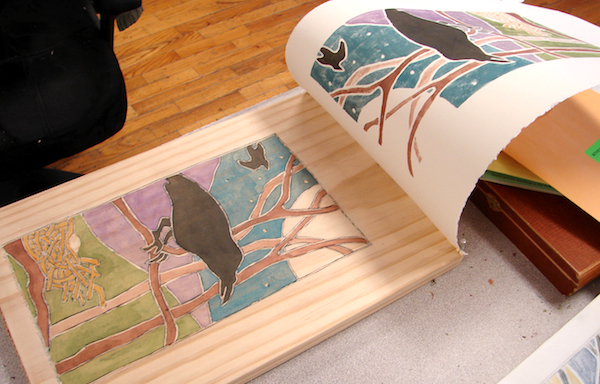
“Crow” Block and Print by Sandy Webster
A lot of people think they can’t dance. But then they try contra dancing: they can jump right in as a beginner. The moves are straightforward, and they don’t need any special skills. With practice, they become smoother and learn some extra moves, but the initial learning curve is a mere ripple in the road.
White line printmaking is the contra dance of the art world. I spent last week in Sandy Webster’s printmaking class and enjoyed every minute of it.
I’d chosen the class for many reasons: I like how woodblock prints look, and the class had a low materials cost. I would not have to buy expensive tools and could use my old watercolor set. As I had hoped, the technique proved to be one that I can easily continue to do at home, even without a studio space.
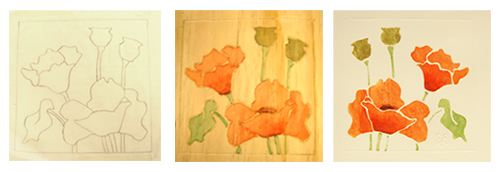
White-line Printmaking Process: Line Drawing, Board, and Print by Emily Buehler
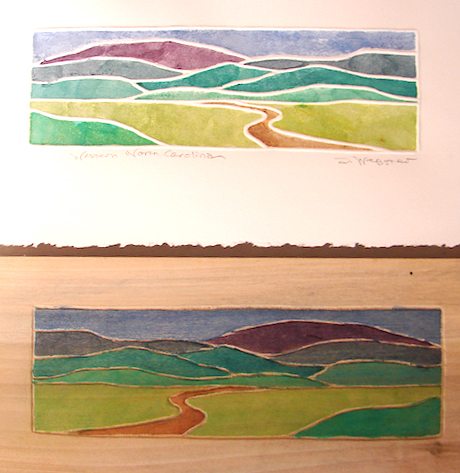
“Landscape” Block and Print by Sandy Webster
Also known as Provincetown printmaking, white line printmaking began in 1914 as an alternative to Japanese printmaking in which each color of the print has its own woodblock. American printmakers carved an entire design into one block, using the carved lines to separate areas that would have different colors. (The carved lines end up white in the final print, giving the technique its name.) Instead of rolling ink over the entire woodblock, the printmaker paints one area at a time, resulting in a multicolored print.
My classmates began drawing flowers, birds, and teacups. Some went for a realistic look, while others chose a highly stylized approach with which white line printmaking works well. Sandy showed examples of prints we could make if we had no drawing skills: a few curved horizontal lines created a convincing mountain landscape, and a square with X’s and O’s cut into it was printed multiple times onto one paper to create a quilt-like pattern.
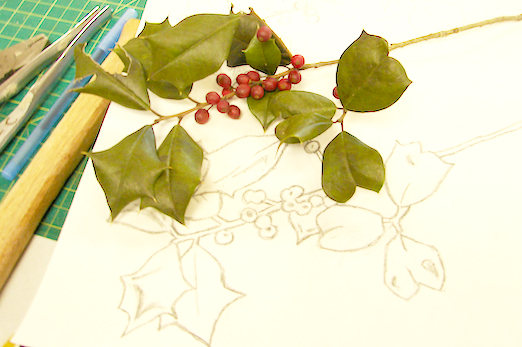
Holly Branch with Sketch and Line Drawing
We reduced our pictures to simple line drawings and traced them onto our wood boards. Using a larger sized board made carving easier and reduced the chance of accidents. We used linoleum-carving tools to chisel away our images. Going with the grain of the board was easy, but going across the grain required a lot of patience.
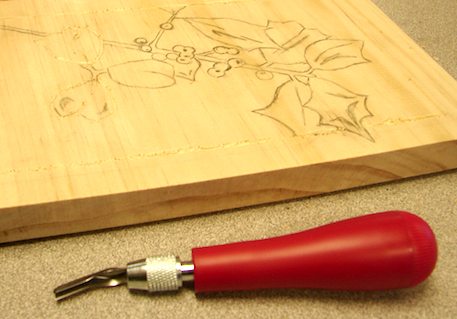
Holly Board and Carving Tool
Once the image was carved, we pinned a sheet of paper to our board so that it could flip up and down, hitting the same place each time. Then we began applying watercolor. The paint soaked into the board, so a wooden dowel was used to rub the paper (a flexible printmaking paper) and transfer the paint. Watercolors had always seemed like a “one shot deal” to me: if you made a wrong stroke, there was no going back. With a wooden board, however, the first rubbing only produced a faint, mottled color. Each subsequent rubbing produced a more opaque result, so that the printmaker could build layers of color without stress. The carved lines contained the paint, making it easy to create the proper image. Sandy also taught us a trick of using dish soap on our boards to make the color transfer more easily.
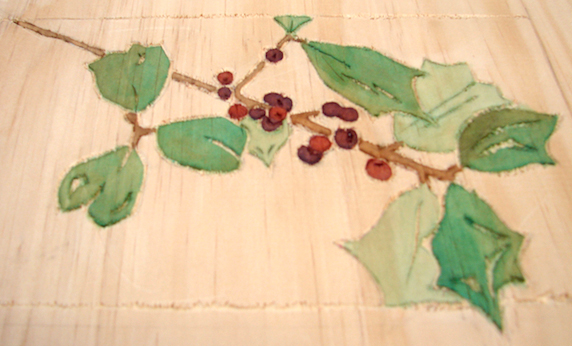
Holly Board, After Painting
By the end of the first day, every student in the class had created a print, and we had the rest of the week to explore campus for inspiration, sketch and create images, and bring them to life with our woodblocks. It was an ideal vacation.
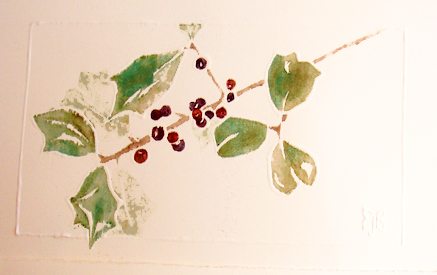
Finished Holly White-line Print by Emily Buehler
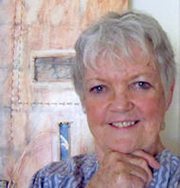 Sandy Webster the instuctor of Emily’s class “White-line Printmaking,” has taught workshops for the past 30 years and has lectured on basketry and fiber-related subjects in the U.S., Canada, Australia, and New Zealand. Her students are encouraged to experiment and try all the possibilities while learning the basics of technique, design, and color. Sandy has a BFA, an MFA, and recently authored the book, “Earthen Pigments: Hand-gathering and Using Natural Colors in Art.” Visit Sandy’s website
Check out Sandy’s upcoming classes this year at the Folk School:
Pigments from the Earth (Nature Studies, Painting) June 8 – 14, 2014
Books, Basket, Box – Placement of Memory (Book Arts, Basketry) August 17 – 22, 2014
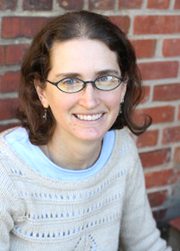 Emily Buehler, the author of this blog, is also an instructor of Bread Making at the Folk School. She became a bread baker in 2001, intending to take a break after finishing a degree in chemistry. Six months later she began teaching bread classes. Emily has written a book on bread making – techniques, not recipes – that includes a section on the science occurring in the dough. (Chemistry does come in handy!) Visit Emily’s website
Emily will be teaching her popular bread making class in June:
The Science of Bread June 1 – 7, 2014
nanette davidson
Posted at 13:25h, 15 JanuaryWhat a wonderful description of this interesting technique. Thank you so much for sharing it with us.Looking forward to seeing you again soon in the cooking studio!
Debbie
Posted at 16:29h, 15 JanuarySo enjoyed your blog and now I can add this project to my list of things I want to learn to do. 🙂
DAvid Lambert
Posted at 18:37h, 15 JanuaryWhen can I sign up for a course?
Cory Marie Podielski
Posted at 12:11h, 17 JanuaryHi David! You can browse the courses the Folk School offers in 2014 on our website:
https://classes.www.folkschool.org/
or you can request a catalog to be mailed to you here: https://www.folkschool.org/Catalog/
Malu
Posted at 17:09h, 16 JanuaryBeautiful work! What kind of paper do you use?Thank you.
Emily Buehler
Posted at 17:39h, 17 JanuaryHi Malu, We used Stonehenge print-making paper. Sandy explained that it is more flexible than watercolor paper, which is necessary so it won’t rip. We did some embossing that you can see if you look closely! Watercolor paper (which is absorbent but more stiff) is not necessary because the paint absorbs into the wood block.
Also, the color was “warm white,” which is less stark than normal white.
Diana Lakes
Posted at 21:39h, 25 AprilI have a question about the whiteline poppy print by Emily Buehler. It is BEAUTIFUL. What kind of watercolors did she use? I made some of these prints – see Story Time at below link
http://www.imcclains.com/images/gallery2001/storytime.jpg
But I mixed my watercolors with a rice paste mix I made, in order to print relatively smoothly.. Did Emily do this? Did she use gouache? Or regular watercolor only? Thank you.
Diana
Cory Marie Podielski
Posted at 10:25h, 06 MayEmily says:
Hi Diana,
I was using gouche–they were my paints from college and had been in my closet 15 years. I didn’t know how they compared to watercolor but wanted to use them up and not buy new materials.
Some of the students painted a layer of dish detergent onto their boards before painting; this stopped the board from absorbing and gave a more even color. I did not do this because I didn’t like the idea of my board being soapy. I just did multiple layers of color. I would say I repainted the poppy and pressed the paper onto the board about 20 times; I also used my water to make the color fade, so that I could have the poppy color fade without lines appearing across it.
We used Stonehenge print-making paper. Sandy explained that it is more flexible than watercolor paper, which is necessary so it won’t rip. Watercolor paper (which is absorbent but more stiff) is not necessary because the paint absorbs into the wood block, and then you get the color back by pressing. The paper color was “warm white,” which is less stark than normal white.
I hope that helps! Thanks for your nice compliments. I will follow your link now.
Sincerely,
Emily
Mary
Posted at 05:03h, 04 AugustHi, I’ve just discovered white line printing. I am relief printmaker, using safe wash inks. Could these be used for white line printing? Ihave v bad arthritis and am delighted to have found this ‘lighter’ way of working still. What is the soap applied to the board, what constituancy? Thanks. Can I follow your blog?
Cory Marie Podielski
Posted at 11:12h, 09 AugustHi Mary, Contact Sandy Webster, our white line printmaking instructor for specific questions about that subject or her class: http://sandywebster.com. Please do follow our blog! We recommend people put our URL into a feed reader like feedly.com. Thanks! Cory
Sue Baptist
Posted at 11:23h, 16 AugustHello,
What type of soft wood was used to carve your design?
Cory Marie Podielski
Posted at 11:59h, 28 AugustHi Sue! I am not sure what wood Sandy used for the class. You could contact her directly to ask about the class supplies: http://sandywebster.com/blog/wp/contact/
MAUREEN TAYLOR
Posted at 08:28h, 28 JanuaryI HAVE STARTED LEARNING TO DO THIS PRINTING PROCESS, HOWEVER I REALLY SON’T KNOW WHAT KIND OF PAPER TO USE. WATER COLOR PAPER DOESN’T PICK UP THE PAINT. THE COUPLE OF JAPANESE PAPER HAVE TOO THIN. I TRIED NEWPRINT AND BELIEVE IT OR NOT I GOT BETTER RESULTS WITH THAT…BUT IT LOOKS CHEAP. WHAT DO YOU SUGGEST?